-
Final Demo
Here’s is the link to check the video of our demo.
-
Final Assembly
After a thorough analysis of the advantages and disadvantages of each feeding mechanism, it was decided to use the endless screw since it allows more precise control of the amount of food that is being served to the pet. The screw is driven by a servomotor that allows 360-degree rotations. Therefore, establishing a relationship between the number of turns and the amount of food served is possible. Establishing this relationship was critical since, based on this relationship, the pets will be fed according to the size and species determined by the user.
Another key feature of the Smart Feeder was the integration of two independent containers. It was determined that there would be two containers in order for the prototype to provide more flexibility to the user. In this way, the user can feed more than one type of pet of the same or different species. It is important to note that each container has an HC-SR04 ultrasonic sensor, which is placed on the top of the container (attached to the lid). These sensors were used to measure the distance to the closest point and make the correlation between distance and level of food in the tank through this value.
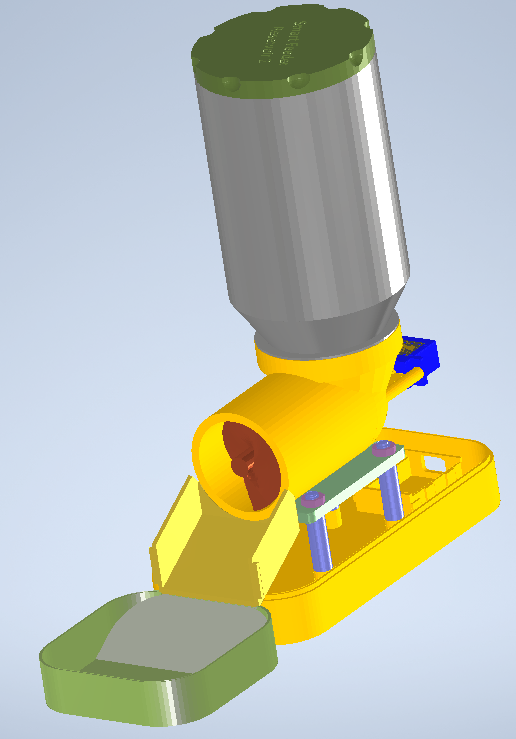
The prototype’s design and the mechanisms were based mainly on the flexibility of the system, ergonomics, and the possibility of being printed in 3D. The final design consists of CAD models published under a free license as well as parts designed especially for this prototype.
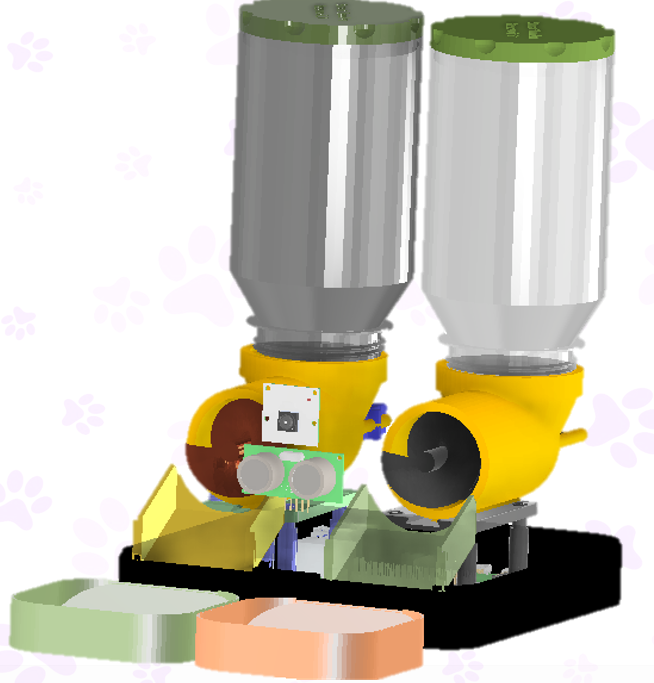
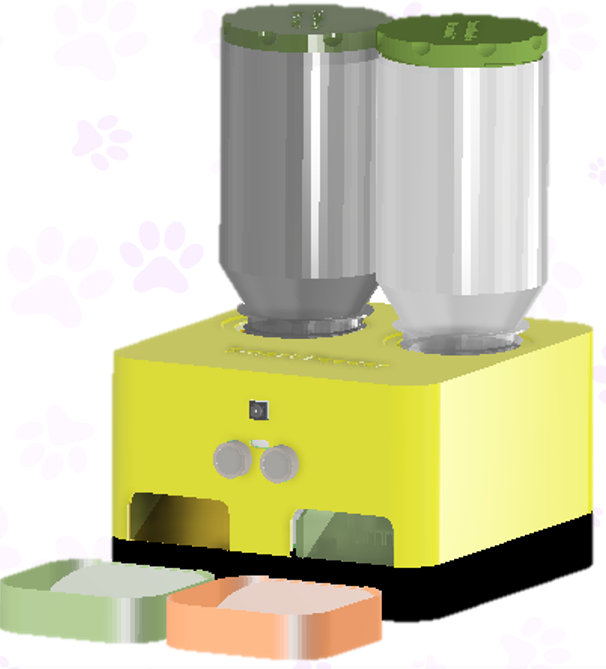
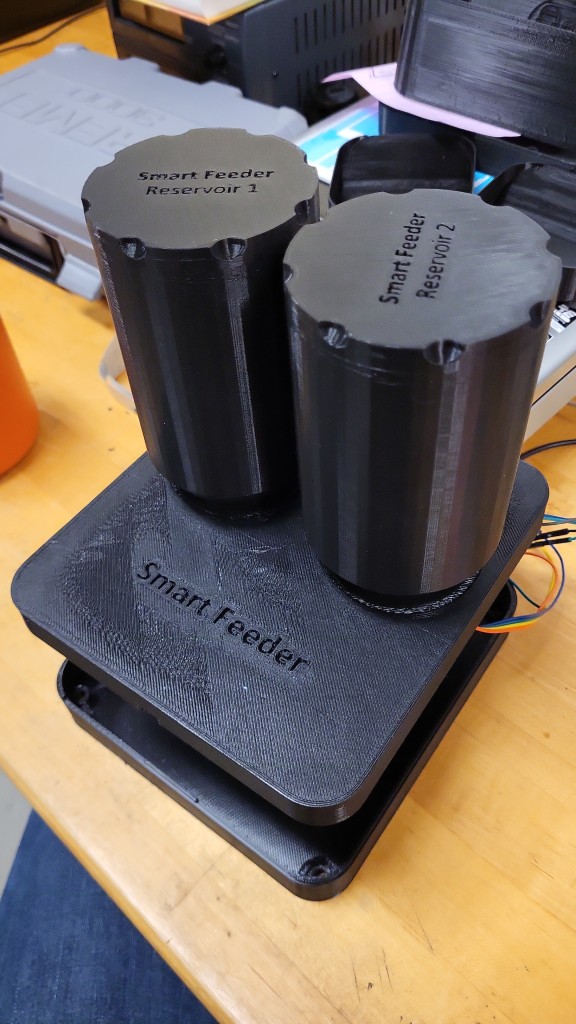
The render of the final design is seen in the figure below. As can be seen, the prototype has two cylindrical containers on the top, a complete case that has two slots on the front for mounting the Raspberry Pi Camera, and another ultrasonic sensor HC-SR04. Additionally, the outer case has two slots for the feed outlet. On the outside, there are two bowls where the food is served. Finally, the prototype has a base on which the Raspberry Pi 4 and the electronics were mounted.
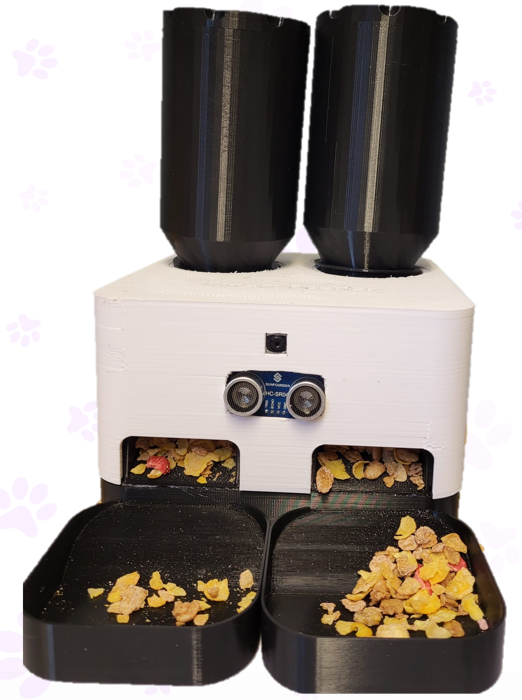
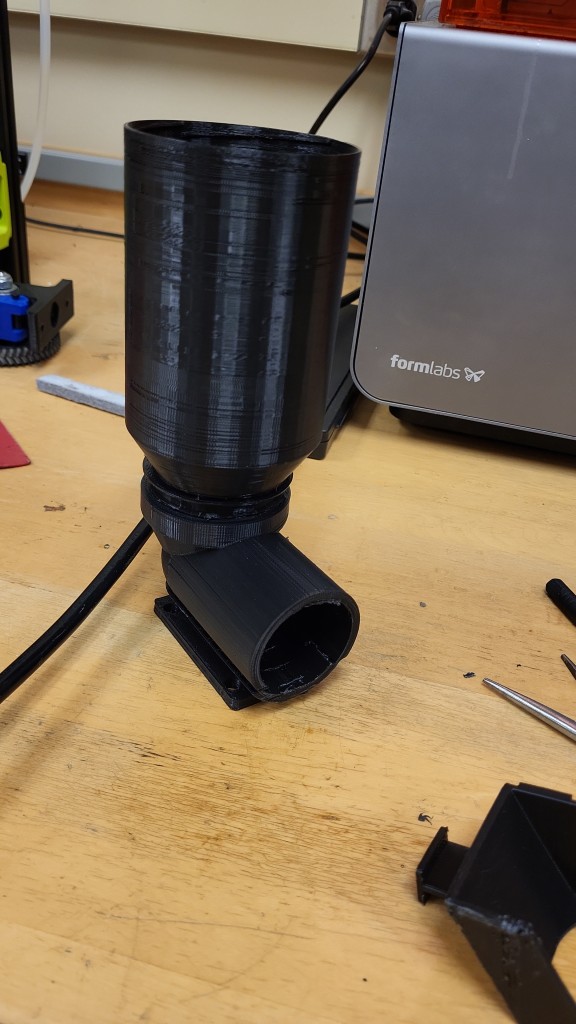
The pieces that make up this design were printed in 3D to assemble the prototype. The finished and assembled prototype can be seen in the picture below.
-
Assembly – Part 1
Since we already have the new parts and part of the control programming finished and tested, we proceeded to try some mechanisms separately.
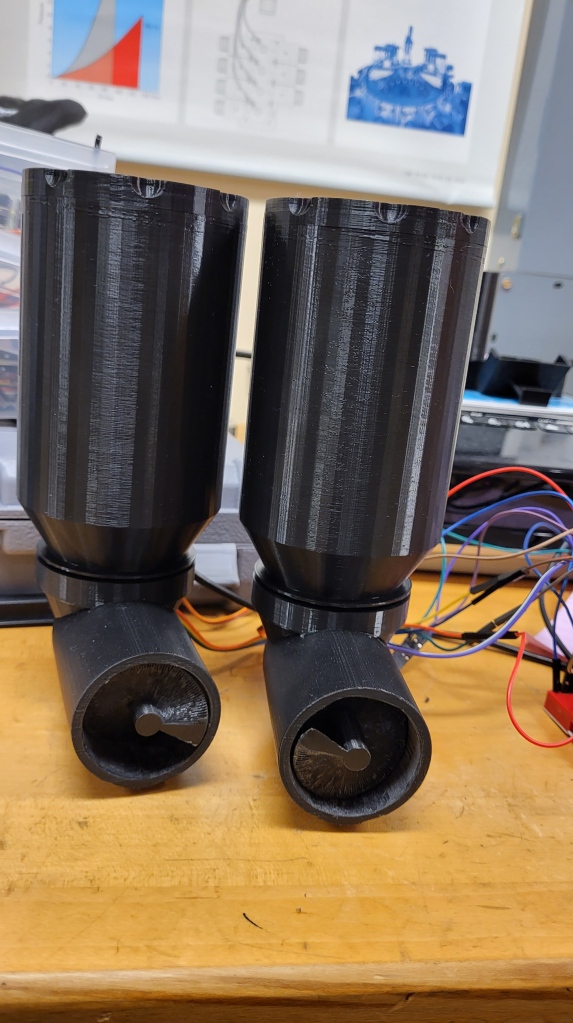
First, we tested the two feeders, including the servomotors and the ultrasonic sensors placed inside the reservoirs.
The tests were successful, and once we verified the correct operation, we proceeded to assemble the feeders to the main base.
We are currently printing our outer case, which will be placed soon once we finish assembling the rest of the electronics.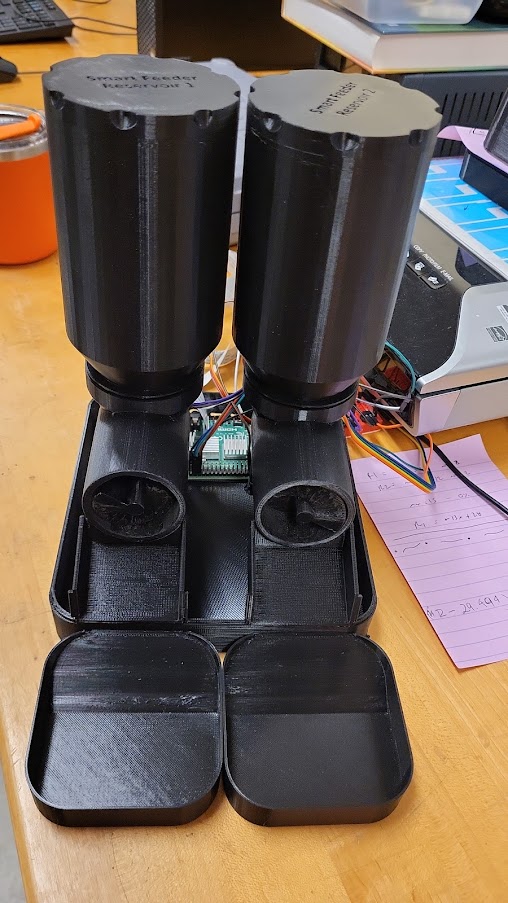
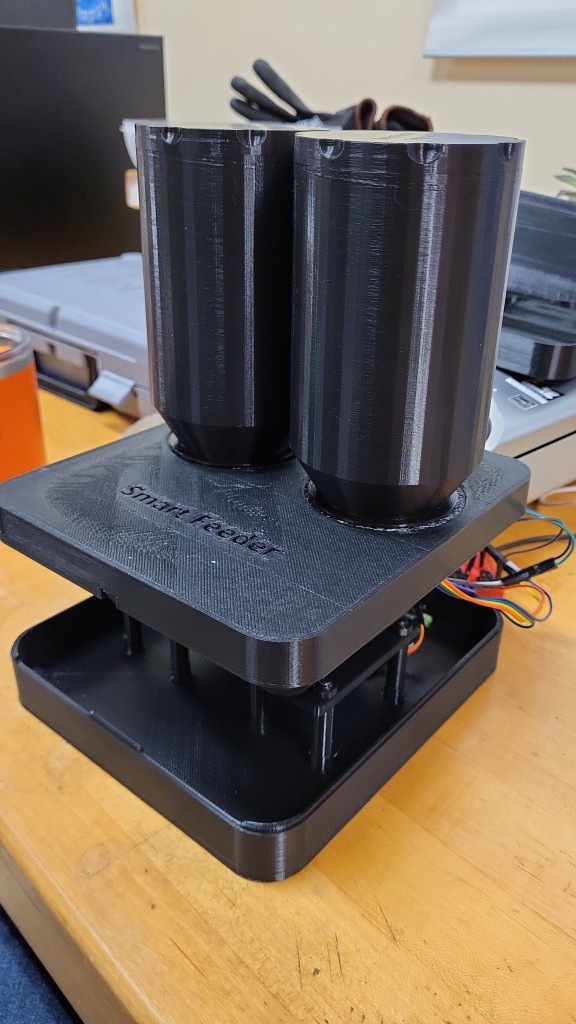
You can check a video of our pre-assembled prototype here:
-
Node-Red Control
Node-Red is a visual programming tool. It visually shows the relationships and functions and allows the user to program simply in a graphical interface based on blocks. Node-Red is a browser-based flow editor where you can add or remove nodes and connect them to each other to make them communicate with each other. Node-Red makes connecting hardware devices, APIs, and online services more accessible.
Node-Red has become the open-source standard for managing and processing data in real-time, simplifying processes between information producers and consumers.Node-Red has established itself as an open-source framework for the management and transformation of data in real time in Industry 4.0, IOT, digital Marketing or Artificial Intelligence systems environments, among others. The simplicity of learning and use, which does not require programming knowledge, its robustness and the need for low computing resources has allowed it to be integrated today in practically the majority of IOT and IIOT devices on the market, as well as Raspberry computers. , cloud systems or local equipment.
Node-Red is a very powerful tool that is used to communicate hardware and services in a very fast and simple way. It greatly simplifies the task of programming on the server side thanks to visual programming.
In our project, we are running Node-Red on a Raspberry Pi 4. Through this, we have programmed the necessary nodes to control our smart feeder.

We will be sharing the details of the blocks and sections within our code in a future post.
-
3D printings – Second attempt
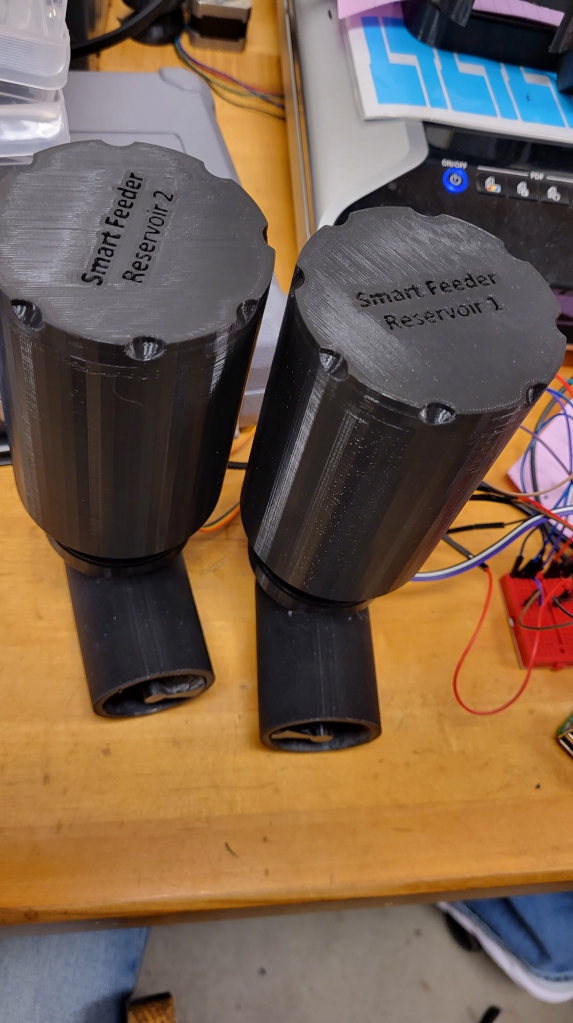
With the support of undergraduate researcher Pou Hei Chan, the pieces were printed again on the PRUSA printer, which has a higher resolution.
The pieces we got were of better quality. This could be observed mainly with the surface finish of the pieces, as well as with the threads.
We extend our thanks to Dr. Min, instructor of the CNIT 581- SDR class and the researcher in charge of the SMART Lab, for his support in printing our prototype and providing the filament for our parts.
-
3D printing – Early attempts
The team has a 3D printer available in the POTR 209 lab. The printer is a LulzBot 5 with a 3mm PLA extruder. This printer however had a problem with a thermistor, which is why it is out of order.
There is another printer in the lab, a LulzBot 6, with a dual-head extruder for 3mm PLA. Some pieces were tried to be printed, however, the finishes were not the best when printing the threads.
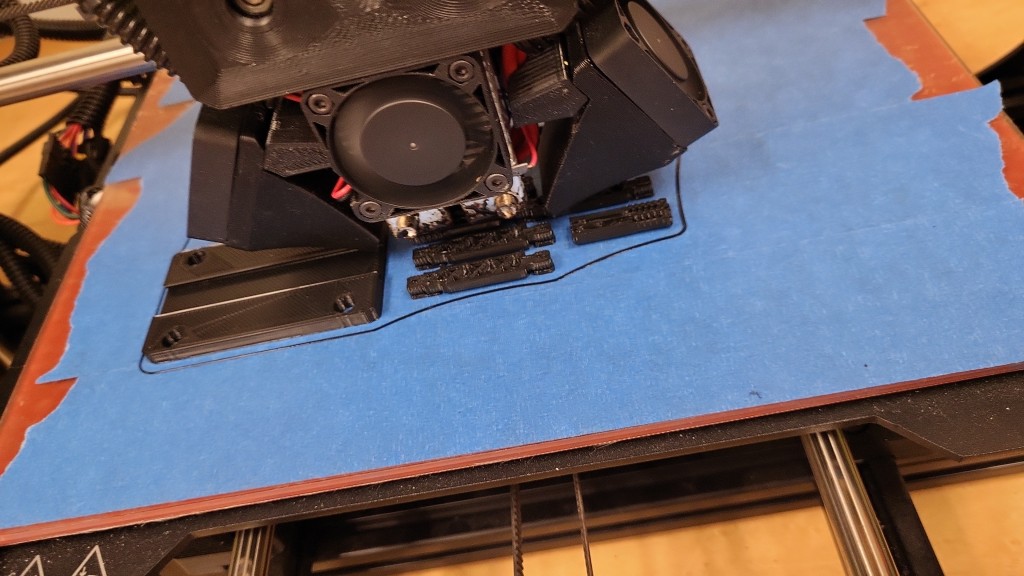
For this reason, the SMART Lab was turned to for help from undergraduate researcher Pou Hei Chan. He has access to a PRUSA printer, which has much higher resolution than the LulzBot printers.
Pou Hei has been a great support to our team by printing the parts and supporting us with his vast experience in mechanical design and 3D printing.
In future updates we will show the new pieces printed in PRUSA.
-
First Update on the Design
We have been working on the design of our feeder. As we have explained before, our goal is to have a device that has two containers that can be operated separately.
Currently, we have worked on the mechanisms that will power the feeder, as well as the internal components that are necessary to assemble it.
The designs have been made from a 3D printing-oriented perspective. The design was sought to be as simple as possible, and the smallest possible size was sought to make it functional.
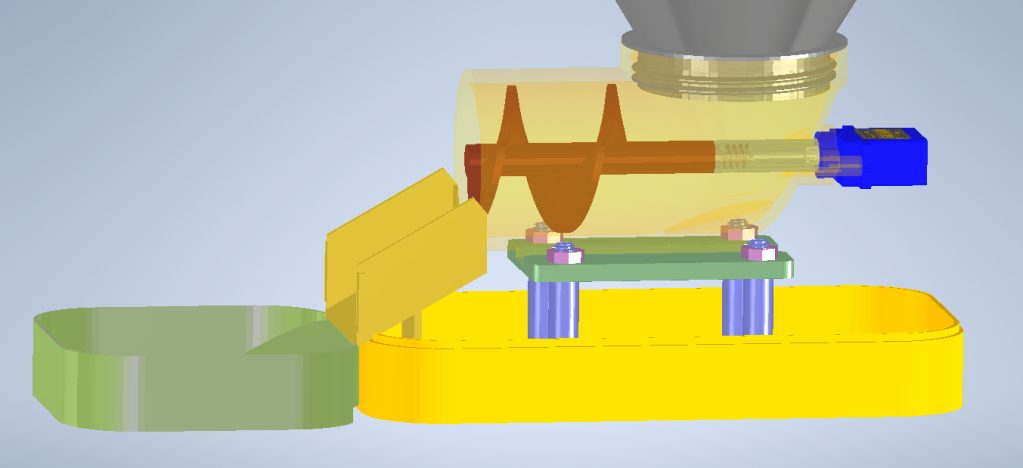
As you can see in the images below, the design consists of a container which will serve to place the food, an endless screw that will be the mechanism that will move the food from the container to the bowl. The design also includes a “tube” that has the space to mount the servo motor to drive the screw. Finally, additional but necessary elements are also considered, such as covers, supports, brackets, etc.
It is still necessary to make the external casings that cover the entire feeder, as well as to make the corresponding modifications to the base since we will have not one but two mechanisms like this.
-
Neural Networks
Processing an image is not something easy to do. It requires artificial intelligence to be able to detect patterns in that image from which it can generate one or several predictions of objects that could be the ones shown in the image.
This type of algorithm can be done in several ways. One of them uses deep neural networks that currently require a little time to sit down to build the architecture and program this network. The specific name for the type of network that will be used is Convolutional Neural Networks, which is the algorithm that most closely resembles the neurons in the human visual cortex. In these algorithms, the system must always be trained with a set of accurate data and a false one, that is, many photos with the object we want to recognize and another bunch of grouped photos without the object we want to recognize.
A network comprises several individual elements (the basic unit) called a perceptron or what would be equivalent to a neuron in our brain. It is composed of 3 main parts:
1. Inputs
2. Addition function (Σ)
3. Activation function

Wikimedia Commons Inputs
These inputs are represented in the previous image as x1, x2, x3,….Xn. Later they will be multiplied by a weight w with a random value at the beginning.
Sum function (Σ)
This function performs the sum of all the inputs multiplied by their respective weight w. At the end of the operation, it sends the result to the activation function.
Activation Function
This function is similar to a key that allows water to pass or closes its passage. It works as a threshold. If the value of the result exceeds a specific number, which is usually 0, the output of the neuron will be activated.
Now that we know the basic unit of a neural network (perceptron), we will now analyze how a neural network operates. To illustrate, we will use the following image:

Tibco.com A neural network is mainly composed of 3 layers:
· input layer
· hidden layer
· output layer
Input Layer
This layer receives all the inputs. There can be an indefinite number of neurons.
Hidden Layer
It receives the output of each neuron that exists in the first layer, performs the same process on each perceptron, and delivers its output to the output layer.
Output Layer
This is the classification layer. Here is the number of neurons equal to the classifiers we need. If we want to know if it is a cat or a dog, we will need two neurons, one for cats and the other for dogs.
All this is very cool, but there is a question that we must ask ourselves… What is learning, and where does it really happen? The learning process is how a neural network modifies its weights W in response to input information. The changes that occur during the learning stage are reduced to destruction, that is, the weight of the connection takes the value 0 (remember that initially, they had a random value), modification and creation (the weight of the connection takes a different value of 0) of connections between neurons. This learning occurs in each perceptron.
An important aspect is to determine the criteria of the learning rule; that is, how the weights are going to be modified. In general, we can consider two types of rules:
· supervised learning
· unsupervised learning
The difference between both types lies in existence or not of an external agent that controls the entire process. One of the simplest ways is calculating the error, that is, the difference between the value of the output that we expect and the one that we actually get.
-
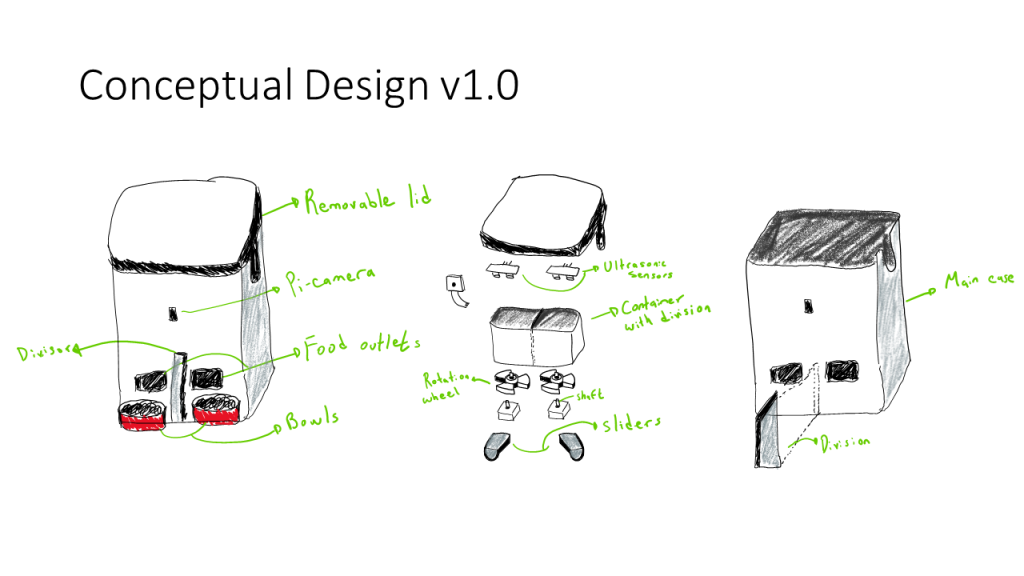
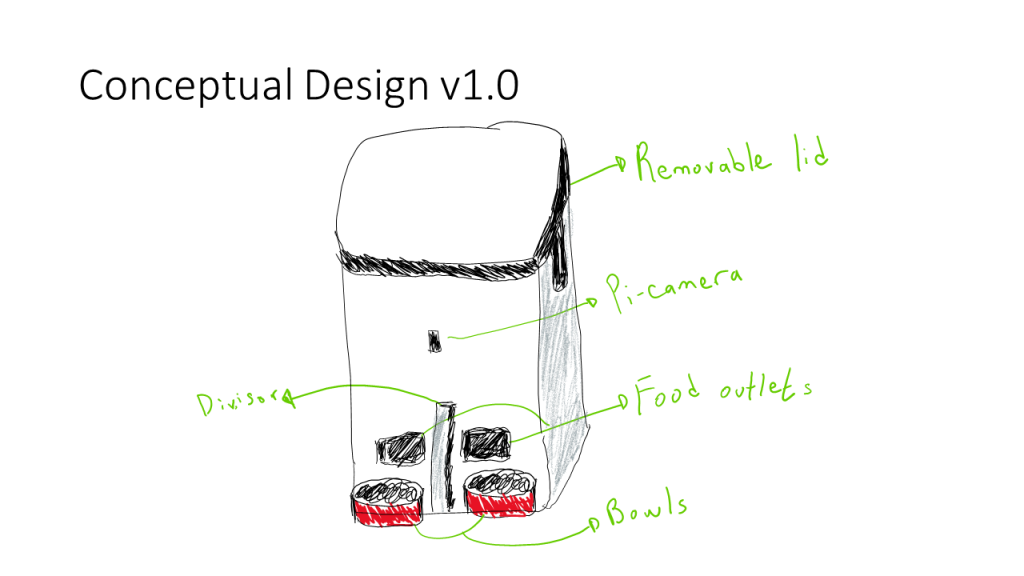
Conceptual Design v1.0
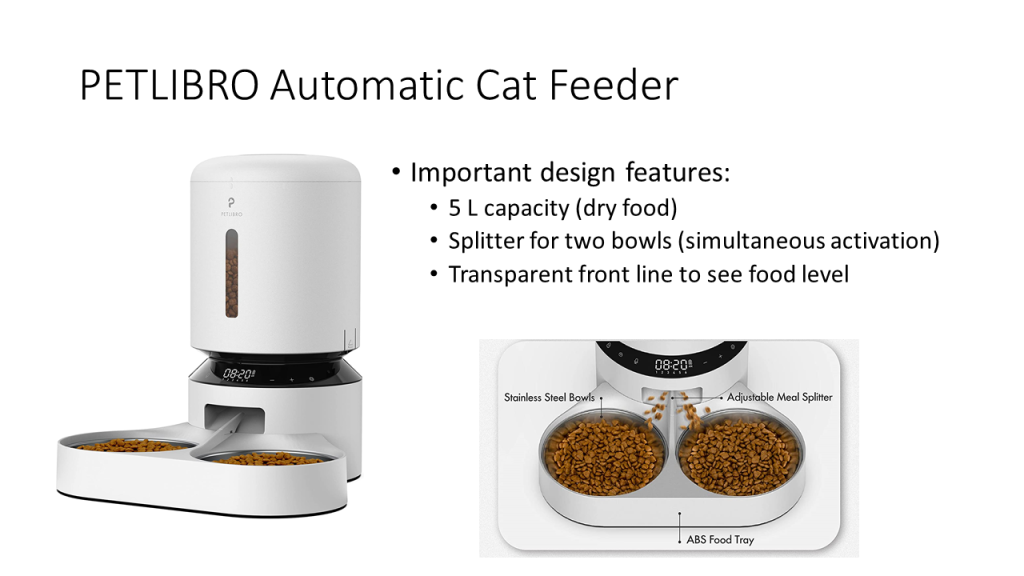
In this post, we present the first conceptual design of the automatic feeder based on current commercial solutions. It is essential to highlight that we want to design and create a novel solution. Thus, different technologies and approaches will be implemented (as discussed in previous posts and during the class).
PETLIBRO Automatic Cat Feeder-Dual Dispenser

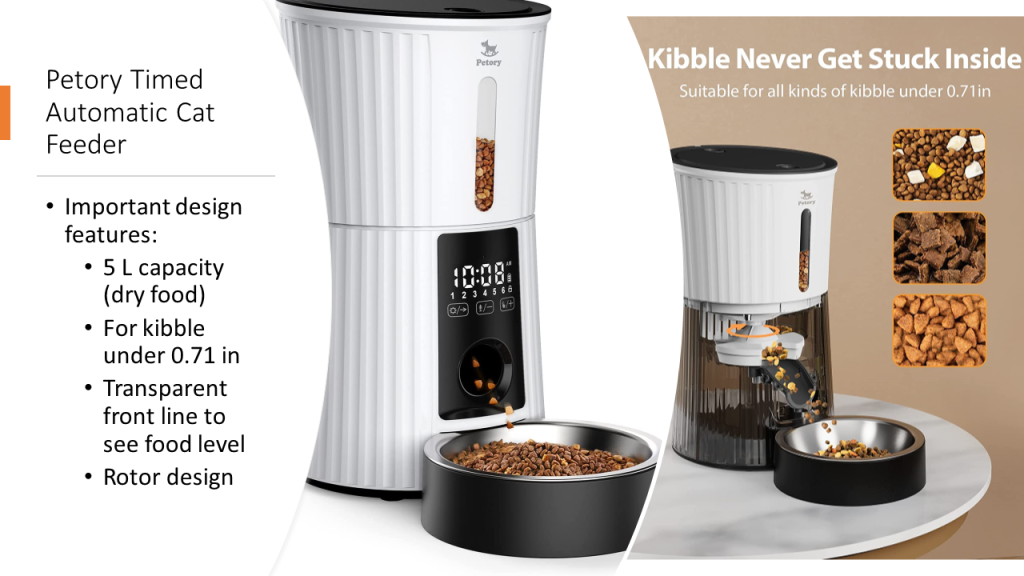
Petory Timed Automatic Cat Feeder
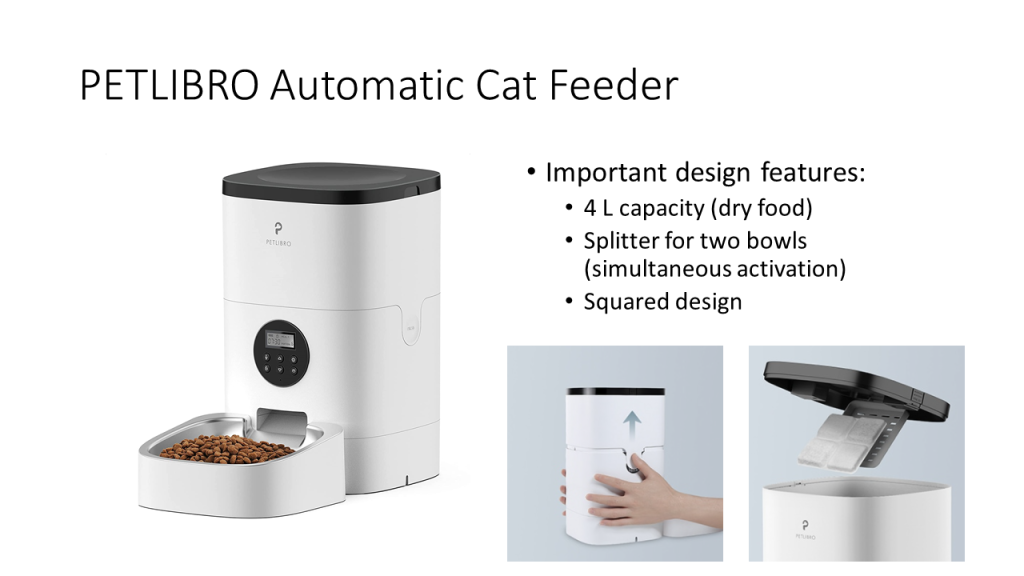
PETLIBRO Automatic Cat Feeder
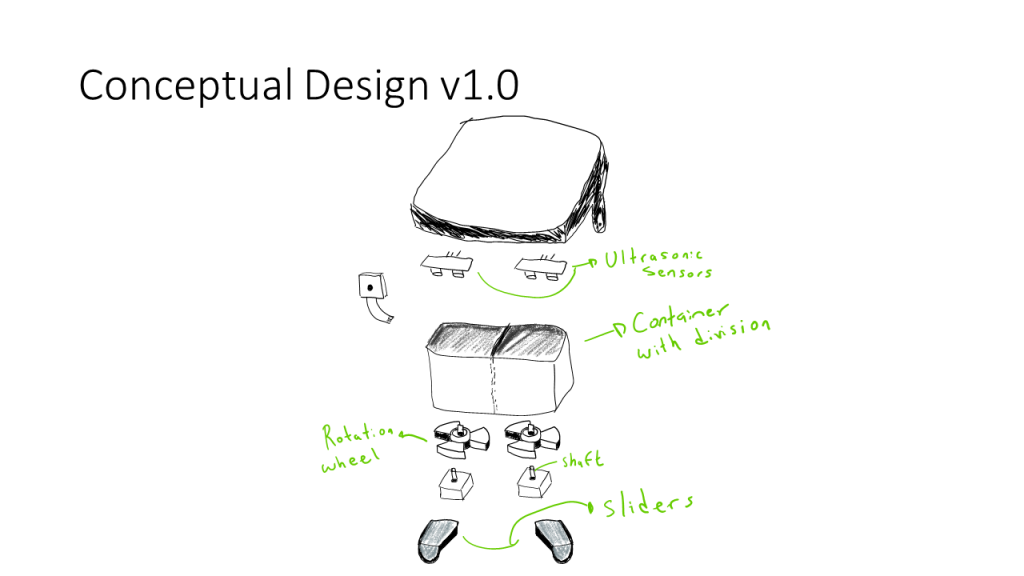
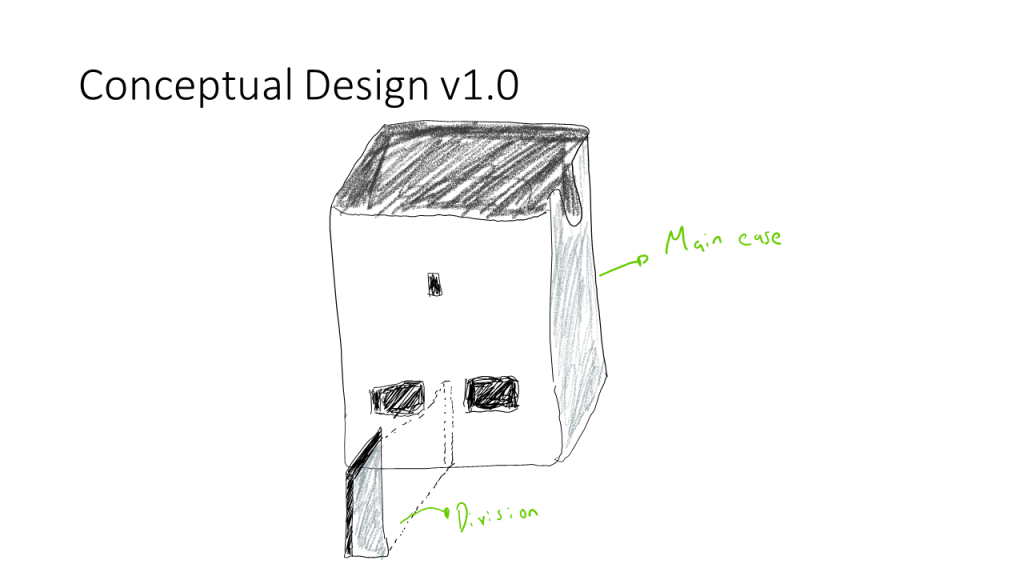
Conceptual Design v1.0
-
About Pet Nutrition
A frequent question that we can ask ourselves is not what to feed pets but how much to feed them and how many times a day. This is because not doing it correctly can lead to problems; falling short can lead to deficiencies, and going too far can lead to overweight or obesity. Dogs and cats, like humans, also suffer from problems resulting from poor nutrition.
For Dogs
Photo by Lum3n on Pexels.com According to pages like Dog First, a basic rule for adult dogs is that: “They should eat between 2-2.5% of their body weight per day in food.” This means that a 30 kilo (30,000 gram) dog, such as a German Shepherd, should eat 750 grams of food per day.
In Dog First they have developed an application to facilitate the calculation from three variables: age of the dog, lifestyle, and weight.
However, it can also be done following the logic and recommendations of animal nutrition experts [1] [2] [3] [4] [5] [6].
1. Pregnant (in the last four weeks of gestation) or lactating bitches should eat between 1.5 and two times more than they would normally.
2. Older dogs, when aging is already visible, have a greater tendency to put on weight. In his case, the amount of feed should be reduced by 20%.
3. Dogs below the ideal weight should increase their intake and not just cover their energy needs.
4. Overweight dogs should do just the opposite and reduce their daily feed intake.
5. Active dogs should also eat more, because they expend much more energy on a daily basis.
6. Sterilized dogs need to be watched because they are hungrier, but their metabolism slows down and they require less energy, so they can become obese.For Cats
Photo by Cats Coming on Pexels.com Cats are pets that prefer to eat several times a day instead of just once, just as they would in the wild. In addition, they do not usually eat more than necessary, but only eat what they need, but even so, the amount of daily food for cats depends on several factors, such as the age, size, physical activity or personality of the animal, and it is the responsibility of the owner to provide them with a balanced and quality diet to prevent the cat from being overweight, or on the contrary, from being malnourished.
Wild cats make small meals based on their prey, which they hunt by instinct. In contrast, domestic cats can eat between 10 and 20 meals a day, ingesting approximately 5 grams at each meal. It is very important for the cat to have food available whenever he needs it, a system called “ad libitum”.
For this reason, the owner must first review the exact amounts according to the type of food and weight, distributing it throughout the day. If the cat correctly manages the intakes, it will only be necessary to know the total daily amount and fill the feeder twice a day. If, on the other hand, the cat is obese or overweight, it should be distributed in several doses, to avoid anxiety. [7] [8] [9] [10]
The amount in grams of daily cat food will depend on the nutritional formula of the product, the grams cannot be known exactly. However, an educated estimate is as follows:
– ~2 kg, between 25 and 40 grams of dry food per day.
– ~3 kg, between 35 and 50 grams of dry food per day.
– ~5 kg, between 40 and 60 grams of dry food per day.
– ~6 kg, between 55 and 85 grams of dry food per day.
– ~7 kg, between 60 and 90 grams of dry food per day.
– ~8 kg, between 70 and 100 grams of dry food per day.
It is important to consider that these weights are indicated for cats with moderate physical activity and without any feeding or health problems.

IoT Smart Pet Feeder – CNIT 581 – SDR
Spring 2022 – Purdue University – Jose Solorio, Diana Narvaez
Search
